
A complete roof inspection report documents property and inspector identification, a roof-system inventory, itemized findings with photos, prioritized repair recommendations, and a scope/limitations statement. For routine homeowner maintenance, a fillable template works well. For a home purchase, insurance claim, or major storm damage, hire a certified inspector.
Two fastest next steps:
- Download a fillable PDF or Word template from NRCIA’s template library or the 30-point checklist at The Roofing Brief and populate it section by section using the field guidance below.
- Book a certified inspector (InterNACHI or ASHI credentialed) any time the report will be used for a real-estate transaction, insurance claim, or when you suspect structural damage.
Pro Tip: InterNACHI’s Standards of Practice define exactly what a certified inspector must report and what falls outside scope. Knowing those boundaries before you read any report saves confusion later.
According to The Roofing Brief’s 30-point checklist, a thorough inspection covers six roof systems and typically produces 20–60 photos and an 8–25 page report. That is the benchmark insurers and real-estate attorneys expect when a report needs to hold up under scrutiny.
Key Takeaways
A valid roof inspection report requires property and inspector identification, a roof-system inventory, itemized findings with photos, prioritized recommendations, and a documented scope statement.
| Point | Details |
|---|---|
| Use the right template | Choose a fillable PDF for insurance or real-estate use; a one-page checklist works for routine homeowner maintenance only. |
| Photo count matters | A thorough inspection produces 20–60 photos; each must be labeled with zone, date, and finding reference to be useful for insurers and contractors. |
| Prioritize findings clearly | Rate every finding as Satisfactory, Monitor, Repair, or Immediate, and list Immediate items first so contractors and adjusters know where to start. |
| Know when to hire a pro | Use a template for routine checks; hire a certified inspector (InterNACHI or ASHI) for home purchases, insurance claims, or any structural concern. |
| Crowleyexteriors for local reports | St. Charles County homeowners can book a free inspection with Crowleyexteriors and receive a zone-mapped PDF report within 48–72 hours, with insurance claim support included. |
Table of Contents
- What every roof inspection report must include
- Sample phrasing and free templates: how to use them
- How a professional roof inspection is actually performed
- Common findings and how to describe them clearly
- Photos, measurements, and documentation that hold up
- Cost and timeline: what a professional report actually runs
- Red flags and vetting: when a free inspection is a problem
- How to use the report: repairs, insurance, and real-estate transactions
- How Crowleyexteriors structures a professional inspection report
- What the template-first approach gets wrong
- Crowleyexteriors serves St. Charles County homeowners with professional roof reports
- Sources
What every roof inspection report must include
A professional report is not a paragraph of general observations. It is a structured document with specific fields, and missing even one section can make it useless for insurance or a real-estate closing.
Property and client identification fields:
- Property address, legal description if available
- Client name, phone, and email
- Inspection date, start time, and approximate end time
- Weather conditions at time of inspection (temperature, wind, precipitation)
- Access notes (locked gate, occupied, tenant present)
Inspector identification and credentials:
- Inspector full name, certification number (InterNACHI, ASHI, or state license)
- Company name, address, phone, and email
- Signature and date of report completion
Scope and limitations statement. This is the paragraph most homeowners skip but every insurer reads first. It defines what was inspected (accessible exterior surfaces, attic if safely accessible) and what was not (areas concealed by snow, furniture, or unsafe pitch). InterNACHI’s Standards of Practice provide the exact language inspectors use for common scope limits, including the explicit statement that inspectors are not required to predict remaining service life or walk on unsafe surfaces.
Roof system inventory:
- Covering material (asphalt shingle, metal, tile, TPO, etc.) and approximate age
- Roof pitch (expressed as X:12) and number of facets/slopes
- Estimated square footage
- Penetrations: chimneys, skylights, vents, pipes
- Drainage: gutter type, downspout count and discharge locations
Itemized findings section. Each finding gets its own numbered entry with:
- Location (zone, compass facing, or ridge/valley/dormer reference)
- Photo ID number(s) tied to attached photos
- Condition rating: Satisfactory / Monitor / Repair / Immediate
- Plain-language description of the defect
- Priority and recommended timeframe (immediate action, within 12 months, or monitor at next inspection)
- Who should perform the work (licensed roofer, structural engineer, general contractor)
Recommended repairs vs. monitoring. This section translates findings into a prioritized action list. Immediate items go first, followed by 12-month repairs, then monitoring notes. Include estimated timeframes and whether the work requires a licensed contractor or can be handled by a handyman.
Required metadata: page numbers on every page, inspector signature on the final page, photo log with GPS or zone tags, and a report version number if revisions are issued.
Photo guidelines. At minimum, include one wide-shot and one close-up per finding. Label every photo with a sequential ID, date/time stamp, and zone reference. High resolution (at minimum 1080p) is the floor for insurance submissions.
Sample phrasing and free templates: how to use them
Templates fall into three practical categories, and choosing the wrong one wastes time.
Three template types and when each fits:
- Quick homeowner checklist: A one-page form covering the six roof systems. Use for annual self-inspections and post-storm triage. Not suitable for insurance or real-estate use.
- Detailed fillable PDF: Multi-page, with fields for every section listed above. Use for pre-listing inspections, property manager documentation, or any report that will be shared with a third party. NRCIA’s residential PDF guide frames this format as the standard for transactions and insurance claims.
- Contractor-format report: Includes a repair estimate section alongside findings. Use when you need a single document that covers both the inspection and the scope of work for a bid.
Sample phrasing for common findings (copy and adapt these directly):
- Active leak: “Water intrusion observed at the north-facing valley flashing, approximately 4 feet from the ridge. Interior ceiling staining present in the attic directly below. Immediate repair recommended by a licensed roofing contractor.”
- Missing shingles: “Three asphalt shingles absent on the southwest slope, approximately 6 feet below the ridge. Exposed underlayment visible. Repair within 30 days to prevent water infiltration.”
- Failed flashing: “Step flashing at the chimney base on the east elevation shows separation and visible rust. Sealant failure noted. Repair recommended within 90 days.”
Photo attachment and captioning. Every photo file should be named with the report number, photo ID, and zone: for example, RPT-2024-001_Photo03_NW-Valley.jpg. The caption in the report body should read: “Photo 03 — Northwest valley flashing, active separation, 3 ft from ridge.”
Pro Tip: When editing a Word template, lock the formatting before distributing it to clients or contractors. A PDF export with form fields disabled prevents accidental edits and keeps the document legally clean.
A roof inspection report is only as useful as its weakest section. A report with 40 photos but no prioritized recommendation list leaves the homeowner, insurer, and contractor all guessing about what to fix first. The recommendation section is where the report earns its value.
When a template is enough vs. when to stop and hire a pro:
- Template is sufficient: annual homeowner maintenance check, post-storm quick triage, property manager routine documentation
- Hire a certified inspector: home purchase, insurance claim filing, dispute resolution, any finding that suggests structural movement or active water intrusion
Download links: NRCIA template library and 30-point checklist PDF.
How a professional roof inspection is actually performed
The inspection method matters because it determines what the inspector can and cannot see, and that directly shapes what the report can claim.
Accepted inspection methods, from least to most invasive:
- Ground/eaves scan with binoculars: Used when the roof is unsafe to walk (steep pitch, wet, fragile tile) or when a quick triage is the goal. Misses granule loss detail and subtle flashing gaps.
- Ladder at eaves: Standard for most residential inspections. The inspector views the lower slopes and gutters from the top of the ladder without walking the roof.
- Topside walk: The most thorough physical method. Used on roofs with a walkable pitch (typically 4:12 or lower) and dry, stable conditions.
- Drone inspection: Required for steep, fragile, or unsafe roofs. Captures overhead imagery and can reach areas a ladder cannot. Increasingly used as a primary method for insurance documentation.
- Infrared/thermal scan: Detects moisture trapped beneath the surface that is invisible to the eye. Typically an add-on to a physical inspection.
- Attic interior check: Confirms deck condition, insulation, ventilation, and any signs of water intrusion from below. InterNACHI’s Standards of Practice require inspectors to report on the general structure from readily accessible areas, which includes the attic when safely accessible.
Step-by-step inspection flow:
- Pre-inspection: Review property records, note roof age, confirm weather conditions are suitable, photograph the home exterior from all four elevations.
- Exterior/topside: Inspect field shingles, ridgeline, hips, and valleys. Note granule loss, cracking, cupping, blistering, or missing units.
- Penetrations and flashings: Check every chimney, skylight, vent pipe, and wall intersection. Flashing failures are the most common source of leaks.
- Gutters and drainage: Inspect gutter attachment, slope, seams, downspout discharge, and any debris accumulation that could cause ponding.
- Attic interior check: Look for daylight penetration, moisture staining, mold, insulation displacement, and deck deflection.
- Photo capture: Photograph every finding with a wide shot and a close-up. Tag each photo to the zone map.
- Wrap-up and report drafting: Confirm all findings are documented, scope limitations noted, and the report is complete before leaving the site.
Equipment list:
- Extension ladder (rated for inspector weight plus equipment)
- Binoculars (for ground-level scans)
- Camera or smartphone with GPS tagging enabled
- Measuring wheel or tape for area estimates
- Moisture meter (for attic checks)
- Thermal camera (if infrared is included)
- PPE: non-slip footwear, hard hat, safety harness for steep pitches
Safety rules: Never walk a roof that is wet, icy, or has a pitch above 6:12 without fall-arrest equipment. Fragile materials (clay tile, slate, aged fiber cement) should not be walked at all. Use drone-only inspection for these surfaces.
The report must document which method was used, whether the attic was accessed, and any areas that could not be inspected. That documentation protects the inspector and sets accurate expectations for the reader.
Pro Tip: Always note the weather at inspection time in the report header. A finding of “no active leaks observed” means something very different on a dry day than after 48 hours of rain.
Common findings and how to describe them clearly
The most frequent defects found in residential roof inspections fall into five categories. Knowing how to describe each one consistently makes the report usable for contractors, insurers, and buyers alike.
Most common findings:
- Missing or damaged shingles (wind uplift, hail impact, age-related brittleness)
- Failed or separated flashing (chimney, valley, pipe boot, wall intersection)
- Ponding water or inadequate drainage slope (flat/low-slope roofs)
- Clogged or damaged gutters and downspouts
- Attic moisture, mold, or inadequate ventilation
Severity scale and recommended actions:
Pro Tip: Use neutral, non-accusatory language in every finding. “Flashing shows separation” is defensible. “Flashing was improperly installed” implies a liability claim and can create legal problems for the inspector.
The single most useful thing a roof report can do is tell the reader what to fix first. A flat list of 22 defects with no priority ranking is noise. A ranked list with four “Immediate” items at the top is a decision.
Documenting location consistently. Use compass-facing labels (north slope, south-facing valley) combined with a simple zone map. Reference the ridge, hips, valleys, and dormers as landmarks. A finding described as “southwest slope, 8 feet below ridge, 3 feet left of center valley” can be found by any contractor without a site visit.
Prioritization checklist:
- Safety hazards and active leaks: fix first, always
- Structural concerns (deck deflection, sagging): second priority, may require an engineer
- Water intrusion risk (failed flashing, missing shingles): third
- Cosmetic issues (surface staining, minor granule loss): last
Photos, measurements, and documentation that hold up
Photos are the single most important evidence in any roof inspection report. A written description of a cracked flashing is easy to dispute. A labeled, timestamped photo is not.
Minimum photo standards:
- One wide-angle shot establishing location context
- One close-up of the defect itself
- One annotated crop (circle or arrow marking the specific defect) for complex findings
- Minimum resolution: 1080p; 4K preferred for insurance submissions
- GPS metadata embedded or manually noted in the caption
Labeling guidelines:
- Assign each photo a sequential ID (Photo 01, Photo 02, etc.)
- Include date, time, and zone in the file name and caption
- Match every photo ID to its corresponding finding number in the itemized findings section
- Never use generic file names like IMG_4892.jpg in a submitted report
Measurement tips. Exact square footage is not always required for a condition report, but pitch and approximate area help contractors estimate repair scope. Pitch can be measured with a pitch gauge or a smartphone app. Area can be estimated by counting facets and applying standard geometry, or by using satellite measurement tools like EagleView or GAF QuickMeasure for larger properties.
Pro Tip: Sketch a simple roof zone map on the first page of the report. Label each slope by compass direction and number. Every finding and photo can then reference a zone number, which makes the report far easier for contractors and adjusters to navigate.

A one-sentence safety note: never walk clay tile, slate, or any aged fragile surface to take measurements. Use drone photography and satellite measurement tools instead.
A complete 30-point inspection covering all six roof systems typically produces 20–60 photos. That range is the practical benchmark for a report that will be used in a transaction or insurance claim.
Cost and timeline: what a professional report actually runs
A basic physical inspection for a standard residential roof runs $75–$400. Add a drone, and the price typically moves to $150–$400 for the drone component alone. Infrared thermal scans add another layer, commonly running $400–$600. The national average across all inspection types sits near $249, but that figure flattens a wide range driven by roof size, pitch, region, and add-ons.
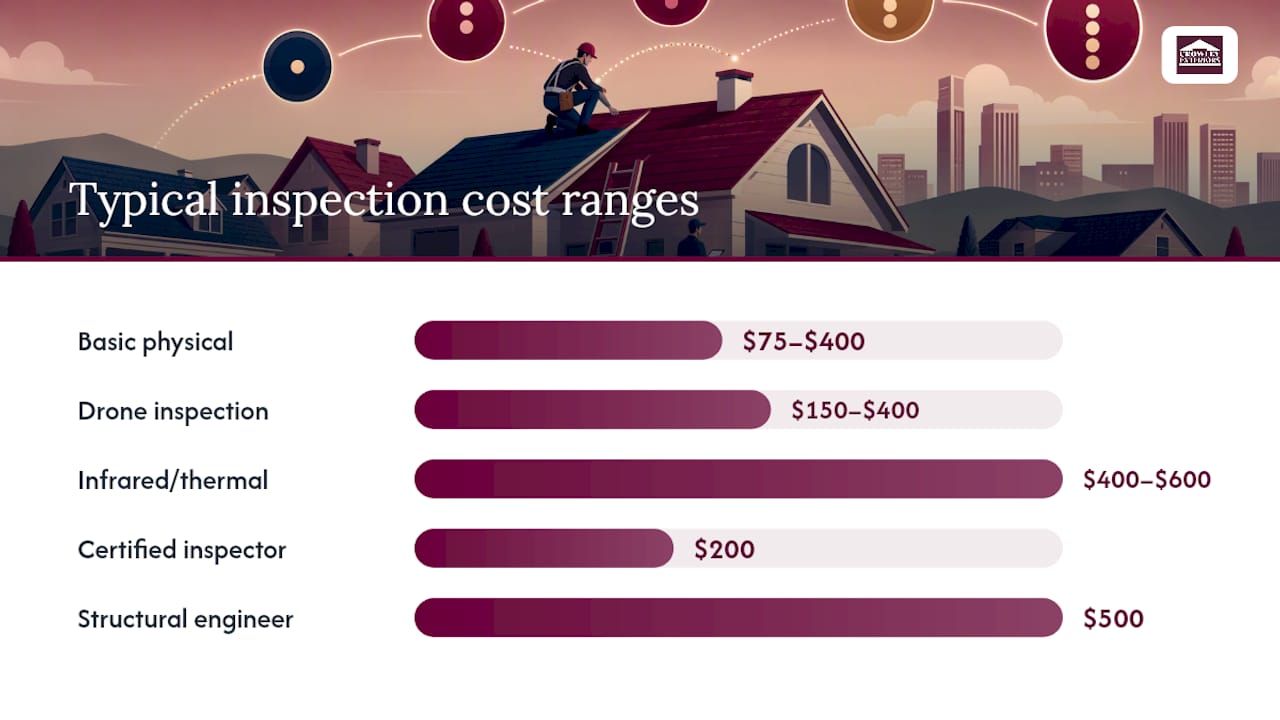
Inspection types, typical costs, and best-use cases:
| Inspection type | Typical cost range | Best use case |
|---|---|---|
| Basic physical inspection | $75–$400 | Annual maintenance, pre-listing triage |
| Drone inspection | $150–$400 | Steep, fragile, or unsafe roofs |
| Infrared/thermal scan | $400–$600 | Suspected hidden moisture, flat roofs |
| Certified inspector (InterNACHI/ASHI) | $200 | Home purchase, insurance, disputes |
| Structural engineer report | $500 | Sagging deck, post-fire, major structural findings |
Cost drivers include roof size, pitch, accessibility, regional labor rates, and add-ons such as attic checks or moisture scans. A 3,000-square-foot roof with a steep pitch in a high-cost metro will run toward the top of any range.
Timeline scenarios:
- Quick triage (24–48 hours): A contractor’s free inspection with a basic written summary. Useful for storm damage assessment before calling your insurer.
- Standard detailed report (48–72 hours): A certified inspector’s full written report with photos, findings, and prioritized recommendations. The format most insurers and real-estate attorneys expect.
- Engineering report (1–2 weeks): A PE-stamped letter from a structural engineer. Required when findings suggest deck failure, post-fire damage, or any structural concern a licensed roofer cannot assess.
When to escalate to a structural engineer. If the report notes sagging or deflection in the roof deck, visible rafter damage, or any finding that suggests the structure itself is compromised, stop. A roofer can replace shingles; only a licensed structural engineer can certify that the deck is safe to load.
Add-on costs to budget for:
- Attic inspection: typically $50–$150 added to a base inspection
- Moisture scan: $100–$200 depending on roof area
- Roof certification letter (for insurance or sale): $100–$300
Regional complexity matters. A straightforward ranch home in suburban St. Charles County will cost less than a multi-gable Victorian in a dense urban market. Always confirm the scope and price in writing before the inspector arrives.
Red flags and vetting: when a free inspection is a problem
Free inspections are not inherently suspicious. A roofing contractor offering a free look before providing an estimate is standard practice and a legitimate way to generate business. The problem is when “free” comes with strings attached.
Red flags to watch for:
- An unsolicited knock on the door within 48 hours of a storm, with an offer to “check your roof for free”
- Pressure to sign a contract or assignment of benefits form before the inspection is complete
- No written report, no photos, and a verbal-only damage assessment
- The inspector cannot name their certification body or provide a license number
- An on-the-spot offer to start tear-off immediately, often with a claim that your insurance will cover everything
Angi’s free inspection guide flags these tactics as common in post-storm scam operations. The pattern is consistent: storm hits, door-knockers appear, pressure mounts, homeowner signs before getting a second opinion.
Questions to ask before you agree to any inspection:
- What is your certification? (InterNACHI, ASHI, or state license number)
- Are you insured? (General liability and workers’ comp, both)
- Will I receive a written report with photos?
- Is this inspection neutral, or are you also bidding the repair work?
- What is your turnaround time for the written report?
- Can you provide references from recent inspections in this area?
Pro Tip: If a contractor inspects and bids the same job, the report is not neutral. For insurance claims or disputes, pay for a certified independent inspector. The $200–$300 cost is cheap compared to a denied claim.
Getting a second opinion is always reasonable when the first report recommends a full replacement on a roof under 15 years old, or when the damage estimate feels out of proportion to what you observed. An independent third-party inspection from a certified inspector carries far more weight with an insurer than a contractor’s self-generated report.
How to use the report: repairs, insurance, and real-estate transactions
A finished roof inspection report is a tool, not a filing cabinet item. The three most common uses each require a different immediate action.
Three uses and the single most important action for each:
- Repair planning: Get three written estimates from licensed roofing contractors. Provide each contractor with the full PDF report, including photo attachments and the itemized findings list. Ask each contractor to respond to every line item, not just the ones they want to address.
- Insurance claim: Submit the full report with photo attachments to your insurer as part of the claim package. Match photo IDs to finding numbers so the adjuster can cross-reference without calling you. Keep a timestamped copy of everything you submit.
- Real-estate transaction: Attach the report to the seller’s disclosure documents or provide it to the buyer’s agent before the inspection contingency deadline. If repairs were made after the report, include receipts and contractor invoices alongside the original report.
Stepwise next actions:
- Repair: Confirm scope with each contractor matches the report’s itemized list. Set a written timeline. Request a post-repair inspection or at minimum a photo record of completed work.
- Insurance: Contact your insurer within 24–48 hours of a storm event. Provide the report before the adjuster’s visit, not after. Note any “Immediate” findings in your first call.
- Real estate: A real estate roof inspection report delivered in digital PDF format is the standard format for transactions. Buyers’ agents and attorneys expect it to include high-resolution photos and a clear prioritized recommendation section.
Re-inspection frequency. For roofs under 10 years old with no findings, every 3 years is a reasonable baseline. For roofs 10–20 years old, every 1–2 years. After any major storm, inspect within 30 days regardless of age. When a report notes “monitor” items, the follow-up interval is set by the inspector, typically 12 months.
For drainage and gutter issues flagged in the report, Crowleyexteriors’s gutter services cover repair and replacement as a natural follow-on to any inspection finding in that category.
How Crowleyexteriors structures a professional inspection report
Crowleyexteriors delivers inspection reports as multi-page digital PDFs with zone-mapped photos, a prioritized repair list, and documented scope limitations. Every report is built to hold up for insurance submissions and real-estate transactions, not just as a contractor’s sales tool.
What the Crowleyexteriors inspection process includes:
- Scheduling within 48 hours for most St. Charles County properties
- On-site inspection using a combination of topside walk (where safe) and drone for steep or fragile surfaces
- Attic access when safely available, with moisture and ventilation notes
- Typically 20–50 photos per inspection, each labeled with zone, date, and finding reference
- Digital PDF report delivered within 48–72 hours of the on-site visit
- Follow-up support for insurance claim documentation, including direct communication with adjusters when needed
Sample report features Crowleyexteriors includes:
- Detailed photo captions tied to itemized finding numbers
- Repair cost estimates for each prioritized item
- Warranty notes where applicable (materials and workmanship)
- Documented scope limitations (areas not inspected and why)
- A simple zone map on the first page for contractor and adjuster reference
Pro Tip: Ask any inspector, including Crowleyexteriors, to confirm in writing whether the report is neutral or tied to a repair bid. Crowleyexteriors provides both inspection reports and repair services, so clarifying the report’s purpose upfront keeps expectations clear for all parties.
Crowleyexteriors’s full services overview covers inspections, repairs, replacements, siding, and gutters, which means a single inspection can flag issues across multiple exterior systems and route them to the right service without requiring a second contractor.
What the template-first approach gets wrong
Most homeowners who download a roof inspection template use it once, fill in half the fields, and file it away. The template did not fail them. They failed the template, because no one told them that the document’s value is entirely in the follow-through.
The conventional advice is to get a report and act on it. The gap is that most reports, even good ones, do not tell the reader what “act on it” actually means in sequence. A homeowner reads “failed flashing at chimney, repair within 12 months” and does nothing for 11 months because the urgency feels abstract. Then a winter storm turns a $400 flashing repair into a $6,000 interior water damage claim.
The 30-point checklist and InterNACHI standards are genuinely useful, but they were written for inspectors, not homeowners. The translation layer, meaning the plain-language explanation of what each finding means for your specific budget and timeline, is what most reports skip. That is the gap a local inspector fills that a template cannot.
For St. Charles County homeowners, Missouri’s freeze-thaw cycles and spring hail season mean that “monitor” items in October can become “immediate” items by March. A template does not know your local weather pattern. A local inspector does.
The other thing the template-first approach underweights: photos. Homeowners filling out a self-inspection form typically take 3–5 photos. A professional report for the same property might include 40. That difference is not about thoroughness for its own sake. It is about having enough documentation to support a claim when the insurer’s adjuster shows up and disputes the scope.
Use the template. It is a real tool. But treat it as a starting point for a conversation with a certified inspector, not a substitute for one.
Crowleyexteriors serves St. Charles County homeowners with professional roof reports
When a template is not enough, Crowleyexteriors delivers what a template cannot: a zone-mapped, photo-documented, professionally written inspection report backed by 25 years of experience with Missouri’s specific weather conditions.

Crowleyexteriors offers free inspections and no-obligation estimates for St. Charles County homeowners. Their reports are built for real use, whether that means submitting to an insurer after a hail event, attaching to a seller’s disclosure package, or simply knowing what your roof needs before winter. The roof replacement service is available when a report finds that repair is no longer the right answer, and every roofing job carries a 25-year workmanship guarantee.
To schedule an inspection or request a free estimate, visit Crowleyexteriors or call directly. The report is delivered within 48–72 hours, with follow-up support for insurance claims included at no additional charge.
Sources
The references below are the primary standards and cost sources cited throughout this guide.
- How to Perform Roof Inspections (InterNACHI)
- The Ultimate Roof Inspection Report Template Guide
- How Much Does a Roof Inspection Cost? 2026 Data | Angi
- 30-Point Roof Inspection Checklist (Free PDF) | TRB
- How Much Does a Roof Inspection Cost? | CurrentCost
Typical inspection cost ranges by type: