


An ice dam is a ridge of solid ice that forms at your roof’s edge when melting snow refreezes before it can drain off, and it’s dangerous because that trapped water backs up under your shingles and into your ceilings. The fastest way to limit damage right now is to protect what’s inside your house, keep everyone off the roof and away from falling ice, and get excess snow off the roof from the ground, not a ladder.
Here’s what to do in the next hour if you’re staring at ice hanging off your gutters:
- Look, don’t touch. Check from inside for water stains on ceilings near exterior walls, and check the attic for wet insulation.
- Protect your interior. Move furniture and electronics away from walls showing any dampness, and set out buckets or towels if you see active dripping.
- Call for help or use ground-based tools. A roof rake worked from the ground can clear fresh snow before it turns into a dam; for an existing ice ridge, that’s a job for a professional.
Never climb onto an icy roof or work from a ladder to chip ice away. That combination of ice, height, and a sloped surface sends people to the emergency room every winter, and it rarely fixes the underlying problem anyway.
Key Takeaways
Preventing an ice dam roof problem comes down to sealing attic air leaks, insulating to recommended R-values, and maintaining continuous soffit-to-ridge ventilation so the whole roof deck stays cold.
| Point | Details |
|---|---|
| Ice dams need three conditions | Snow cover, a warm roof deck, and a cold eave all have to occur together for a dam to form. |
| Short-term steps have limits | Roof raking and calcium chloride socks reduce risk temporarily but never fix the underlying heat loss. |
| Attic performance is the real fix | Air sealing, insulation to R-38, and a baffled ridge vent stop dams from recurring. |
| Safety rules are non-negotiable | Never climb an icy roof or chip ice from a ladder; call a professional for large dams. |
| Crowley Exteriors offers free inspections | A no-cost attic and roof inspection with a written estimate helps homeowners target the actual cause. |
Table of Contents
- What Causes an Ice Dam on a Roof
- Signs of Roof Ice Buildup and When to Worry
- Safe DIY Steps to Prevent Ice Dams This Winter
- How Professionals Remove Ice Dams Safely
- The Best Long-Term Fix: Attic Insulation and Ventilation
- Retrofit Options: Underlayment, Heat Cables, and Gutter Upgrades
- When to Call a Roofing Contractor for Ice Dam Damage
- Seasonal Maintenance Checklist for Ice Dam Prevention
- A Contractor’s View on Fixing Ice Dams for Good
- Get a Free Inspection Before Next Winter’s Freeze
- Authoritative Resources for Ice Dam Prevention
- Frequently Asked Questions
- Sources
What Causes an Ice Dam on a Roof
Three things have to happen at once for an ice dam roof problem to develop: snow has to be sitting on the roof, part of the roof deck has to be warm enough to melt it, and the eaves have to stay cold enough to refreeze that meltwater. Take away any one of those conditions and dams can’t form. That’s the whole puzzle, and it’s why prevention strategies target either the heat source or the temperature difference, not the snow itself.
Here’s the mechanical version. Heat escaping from your living space, through poor insulation, gaps around light fixtures, or a leaky attic hatch, warms the underside of the roof deck above the heated part of the house. Snow sitting directly on that section melts. The water runs downhill under the snowpack until it reaches the eaves, which overhang unheated space and stay right at or below freezing. There, the water refreezes, and each melt cycle adds another layer of ice until you’ve got a solid berm blocking drainage. According to UMN Extension, the roof deck typically needs to sit above 32°F while the exposed eave stays below it for this cycle to run.
It doesn’t take a blizzard to cause serious problems. A poorly insulated attic with recessed lighting and a leaky access hatch can generate enough heat loss to melt a few inches of snow into a steady trickle, even during a mild cold snap. Meanwhile, a well-sealed, well-ventilated attic in the same neighborhood, under the same snowfall, might stay uniformly cold from ridge to eave and never form a dam at all. The difference isn’t the storm. It’s what’s happening under the shingles.
Signs of Roof Ice Buildup and When to Worry
Not every icicle means trouble. A thin fringe of icicles along a gutter after a cold, sunny day is common and usually harmless. What separates a cosmetic issue from an emergency is thickness, location, and whether water is finding its way inside.
Watch for these signs:
- A thick, continuous ridge of ice along the gutter line, especially one that’s visibly growing day over day.
- Ice forming on the soffit or working its way up under the first few courses of shingles.
- Icicles a foot or longer hanging directly over doorways, walkways, or driveways.
- Water stains, bubbling paint, or damp drywall on ceilings near exterior walls or in upper-floor closets.
- A musty smell in the attic, which often shows up before visible mold does.
- Sagging gutters or gutters pulling away from the fascia board under the weight of ice.
If what you’re seeing is a modest ice fringe with no interior symptoms, you can usually monitor it and plan prevention work for after the season. If you’re seeing an interior stain, a rapidly thickening ridge, or ice creeping under the shingle line, that’s an urgent situation. Water is already past your roofing and into your home’s structure, and the damage compounds with every freeze-thaw cycle. Consumer advocates note that homeowners should check their insurance coverage for interior water damage before assuming a claim will cover ice dam repairs, since policies vary on how they treat gradual versus sudden water intrusion.
Safe DIY Steps to Prevent Ice Dams This Winter
You can reduce ice dam risk yourself, as long as you stay off the roof and stick to ground-level tools. Work through this checklist in order, and stop at whichever step matches the severity you’re seeing.
- Clear valuables from risk zones. Before anything else, move anything irreplaceable away from ceilings or walls showing moisture.
- Rake fresh snow off the lower roof section. Use a long-handled roof rake from the ground to pull snow off the first several feet of roof above the eaves. Removing that insulating layer takes away one of the three ingredients an ice dam needs, according to UMass Building and Construction Technology.
- Create drainage channels if a dam has already formed. Calcium chloride ice-melt socks, laid perpendicular across the dam so they melt a channel through it, let trapped water drain off the roof instead of backing up under shingles. Never use rock salt on shingles; it’s corrosive to roofing materials and flashing.
- Watch for falling ice while you work. Rake in short passes and step back after each one. Loosened ice and snow can drop without warning.
Don’t: climb a ladder to reach the roof, use a hammer, axe, or shovel to chip at ice on the roof or in gutters, or assume a bigger ice-melt dose works faster. Overloading calcium chloride can pool caustic runoff onto plants and concrete below.
Pro Tip: The best window for roof raking is right after a storm, before the sun and daytime temperatures start a melt cycle. Once a dam has already refrozen solid, raking snow off above it does less good, because the blockage itself is the problem, not the fresh snow.
How Professionals Remove Ice Dams Safely
Roofing contractors reach for low pressure steam over hammers, picks, or hot water for one simple reason: it melts ice without gouging shingles or driving water further under the roofing. A steamer applies controlled heat directly to the ice, working from the eave upward, so the crew clears a channel without the blunt-force risk of chipping. Coverage from the Boston Globe on professional ice dam removal confirms steam has become the standard approach precisely because it protects the shingle mat underneath.
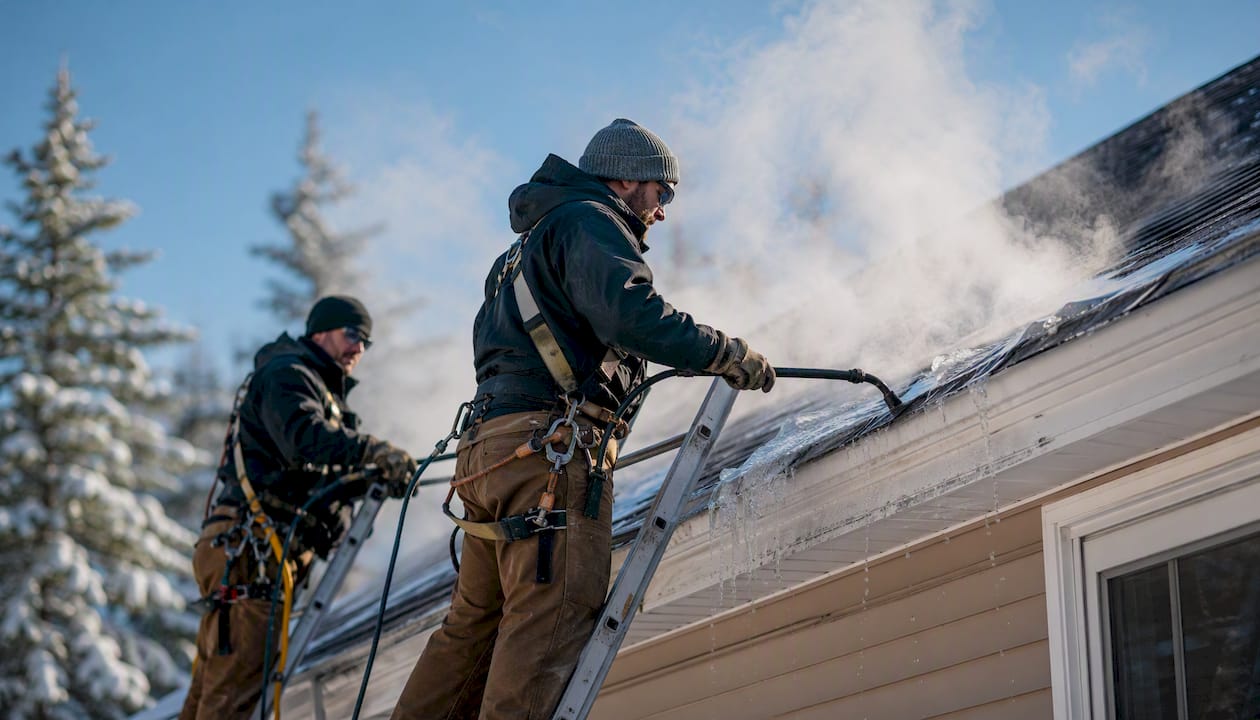
What you’re paying for isn’t just the removal, it’s the judgment call that comes before it. A trained crew checks the attic before they ever get on the roof, looking for the heat leaks and insulation gaps that caused the dam in the first place. That inspection matters because removing ice without addressing the cause just buys you another dam next cold spell.
DIY removal skips that diagnostic step entirely, and it usually skips the fall protection too. Professionals work with harnesses, roof anchors, and ladder stabilizers that most homeowners don’t own and shouldn’t improvise. Add in the physical difficulty of standing on an ice-covered slope, and the case for calling a pro on anything beyond a light snow-rake job gets pretty straightforward.
The Best Long-Term Fix: Attic Insulation and Ventilation
If you take one thing from this article, take this: the definitive fix for a recurring ice dam roof problem isn’t better ice-melt or a fancier rake. It’s making your attic airtight, well-insulated, and well-ventilated, so the roof deck stays a uniform cold temperature from ridge to eave all winter. Building Science Corporation puts it plainly: airtight ceilings, sufficient insulation, and effective ventilation are the three pillars, and they matter roughly in that order.
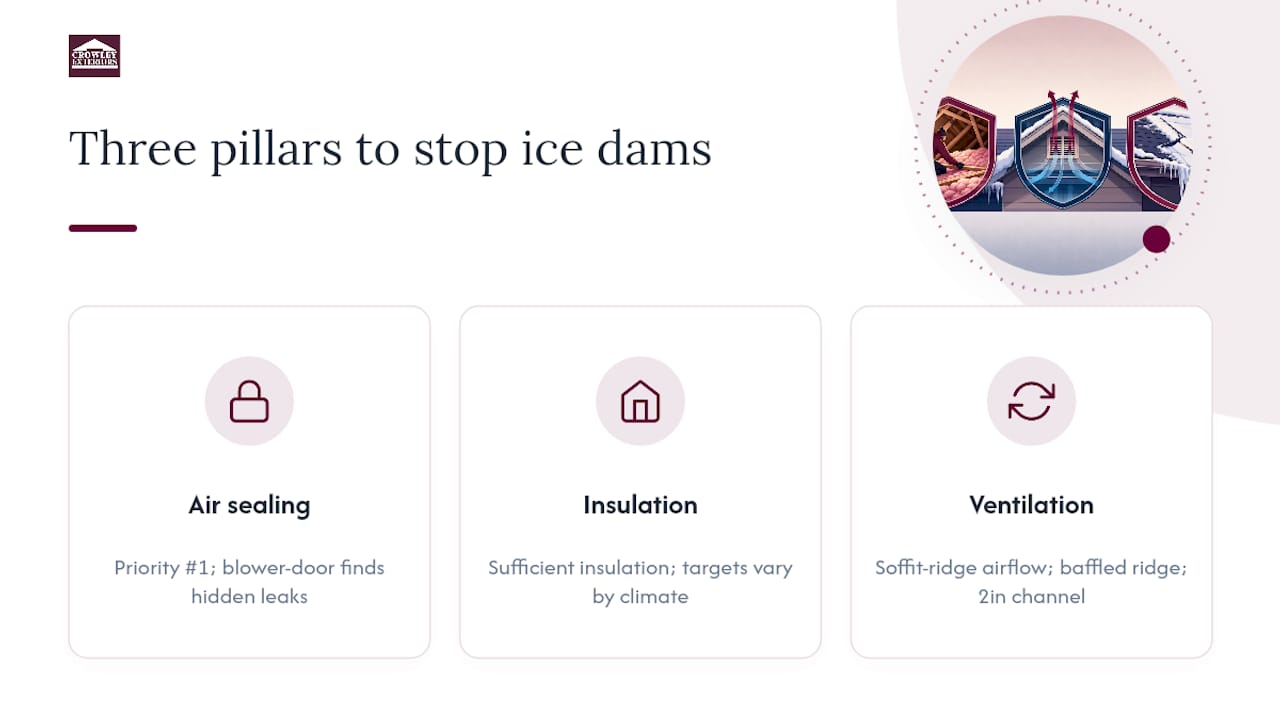
Air sealing comes first because warm air leaking into the attic does more damage than heat conducting through insulation. Common bypass points include the attic hatch, recessed lighting fixtures, plumbing stacks, chimney chases, and the top plates of interior walls. A contractor doing this work correctly will often run a blower-door test to find leaks that aren’t obvious just walking through the attic. Ductwork and furnace equipment stored in attic spaces are frequent offenders too. If your HVAC system runs supply lines through an unconditioned attic, poor duct sealing can dump enough heat to melt snow directly overhead, which is worth a look alongside your attic’s insulation and air sealing; see these HVAC efficiency improvement tips for homeowners for more details.
Insulation targets vary by climate and roof assembly, but the guidance below reflects commonly cited minimums for cold-climate homes.
Ventilation is the third leg, and it works by keeping the whole roof deck cold rather than relying on insulation alone to stop every bit of heat. The goal is continuous airflow entering at the soffits and exiting at the ridge. A baffled ridge vent, one designed to exhaust regardless of wind direction, performs more reliably than a standard ridge vent, and a full 2-inch continuous air channel from soffit to ridge outperforms the 1-inch minimum some codes allow, particularly in snow-heavy regions. Baffles installed at the eaves keep insulation from blocking that soffit intake, which is one of the most common ventilation failures inspectors find.
Pro Tip: If your home was built with standard trusses, insulation often gets compressed to almost nothing right where the roof meets the exterior wall, exactly where you need it most. Raised-heel trusses (also called energy trusses) lift the roofline at the eave, leaving room for full-depth insulation all the way to the outer wall instead of tapering off. It’s a framing detail most homeowners never hear about until an inspector points out why their eaves keep icing up.
Retrofit Options: Underlayment, Heat Cables, and Gutter Upgrades
Not every home is a candidate for a full attic overhaul right away, and several retrofit products can reduce risk or buy time in the meantime. None of them replace attic performance work as the long-term fix, but each has a role.
- Self-adhering ice and water shield: A rubberized membrane installed under shingles at eaves, valleys, and around penetrations. It acts as a redundant waterproofing layer, so if meltwater does back up, it can’t reach the roof deck. UMass Extension frames it as a backup, not a cure, since it does nothing to stop the heat loss causing the dam.
- Heat/de-icing cables: Electric cables run in a zigzag pattern along the eave and through gutters to melt channels through ice. They help in the short term but run on your electric bill all winter and need annual inspection to catch damaged sections.
- Metal roofing: Smooth metal panels shed snow faster than shingles and give ice less to grip, which reduces (though doesn’t eliminate) dam formation on steep slopes.
- Gutter upgrades and guards: Well-secured, properly pitched gutters drain faster and hold less standing water to freeze. Damaged or undersized gutters make ice dams worse by giving meltwater somewhere to pool right at the roof edge; our gutter services team frequently finds gutter damage as a downstream symptom of a winter’s worth of ice.
- Calcium chloride socks: Cheap, fast, and good for emergency drainage channels, but they’re a stopgap measure applied after a dam already exists, not a prevention tool.
| Retrofit Option | Cost Shape | Permanence | Maintenance |
|---|---|---|---|
| Ice & water shield | Moderate, installed during roofing work | Permanent once installed | None after installation |
| Heat cables | Low upfront, ongoing electric cost | Temporary, seasonal setup | Annual inspection required |
| Metal roofing | High upfront | Permanent | Low |
| Gutter upgrades/guards | Low to moderate | Permanent | Periodic cleaning |
| Calcium chloride socks | Very low | Single-season, reactive | None, single use |
Underlayment is a reasonable “belt and suspenders” layer when your roof already has decent attic performance and you’re just adding backup protection. It’s the wrong first move if your attic is under-insulated and leaky. In that case, you’re waterproofing a symptom while the actual cause keeps producing more ice every winter.
When to Call a Roofing Contractor for Ice Dam Damage
Call a professional when you see interior leaks, a ridge of ice that keeps growing despite raking, repeated dams in the same spot year after year, or icicles large enough to pose a real falling hazard. Any one of those is a sign the problem has outgrown DIY tools.
A thorough inspection covers more than the ice itself. Expect a contractor to check the attic for air leaks and insulation gaps, sometimes with a blower-door or infrared camera to spot heat escaping through the roof deck, and to inspect the roof covering, underlayment, flashing, and gutters for existing damage. If your home has had recurring problems, ask whether they’re checking duct sealing and HVAC equipment in the attic too, since that’s an overlooked heat source.
Costs vary widely by region and roof complexity, so treat any figure as a starting point for a conversation, not a quote. Snow and ice removal service tends to run as a one-time seasonal call. Attic air sealing and insulation upgrades are typically a bigger, one-time investment that pays off over multiple winters. Full retrofits involving roof replacement with new underlayment cost more upfront but address the roofing and the attic performance at once. Timelines run from a same-week visit for emergency removal to a single day for most attic air-sealing and insulation work, with roof replacement projects taking longer depending on scope.
Seasonal Maintenance Checklist for Ice Dam Prevention
Ice dam prevention is a year-round habit disguised as a winter problem. Most of the effective work happens before the first snowfall.
- Before winter: Have your attic checked for insulation depth and air leaks, top up insulation where it’s thin, clean gutters completely, and test heat cables if you use them.
- After a major snowstorm: Rake accessible snow off the lower roof within a day or two, before a warm spell triggers melting. If ice has already formed a ridge, that’s the point to call a professional rather than wait for a spring thaw.
- Mid-winter: Do a quick visual check after any thaw-freeze cycle. New icicles or a thickening ridge mean it’s worth a second look at your attic setup.
- Ongoing, year-round: Keep soffit vents clear of stored items or blown insulation, clean gutters each fall, and schedule an annual attic check even in years without visible ice problems.
A Contractor’s View on Fixing Ice Dams for Good
I’ve spent more than 25 years working on roofs across St. Charles County, and the pattern with ice dams never really changes: homeowners call about the ice, but the ice is never the actual problem. It’s a symptom of an attic that’s leaking heat somewhere. Every time we go out for an ice dam call, the first thing we do is head for the attic hatch, not the roof edge. Removing the ice without fixing the heat source is like bailing water out of a boat without patching the hole.
What surprises people is how often the fix is boring. It’s not a fancy product; it’s caulk around a light fixture, a sealed attic hatch, and insulation restored to full depth at the eaves. The homes we see with repeat ice dam problems almost always have some combination of thin insulation at the eave and an attic bypass nobody knew existed. Once those get addressed, the dams usually stop coming back, which tells you the diagnosis was right in the first place.
If there’s one thing I’d tell every homeowner dealing with this: don’t spend money on the roof edge before you’ve spent time in the attic. That’s where the actual problem lives, and it’s where a real fix starts. At Crowley Exteriors, every inspection starts free, and every roofing job we complete carries a 25-year workmanship guarantee, because we’re planning for you to still be happy with the work a couple decades from now.
Get a Free Inspection Before Next Winter’s Freeze
If reading through attic air sealing, R-values, and ventilation channels has you wondering whether your own roof is set up right, that’s exactly the question a free inspection answers. Crowley Exteriors has spent more than 25 years working on roofs across St. Charles County that deal with the same freeze-thaw cycles described throughout this guide, and every inspection comes with a no-obligation estimate and clear, written pricing.

When you schedule an inspection, ask for specifics, not a vague once-over. Request an attic check for insulation depth and air leaks, a look at your soffit-to-ridge ventilation setup, and a written scope covering any underlayment or gutter recommendations tied to ice-dam risk. A contractor worth hiring should be able to walk you through insulation R-targets for your specific attic and explain exactly what they’d change and why.
Bring your questions about gutter repair if ice has already pulled your gutters loose, or about full roof replacement if this winter revealed underlayment or shingle damage beyond a simple patch. You can browse the full range of services Crowley Exteriors offers, or head straight to the Crowley Exteriors homepage to request your free inspection before the next cold front rolls through.
Authoritative Resources for Ice Dam Prevention
For homeowners who want to dig into the technical side, UMN Extension’s ice dam guide covers the core mechanics and homeowner-level prevention steps in plain language. Building Science Corporation’s BSI-97 report is the deeper technical read for anyone who wants the building-science reasoning behind air sealing and ventilation priorities. The BASC/PNNL resource guide is useful for retrofit-specific detail, including vented over-roof construction for homes where standard attic work isn’t practical. UMass Building and Construction Technology’s guide offers a homeowner-friendly rundown on underlayment and roof raking. For safety-focused, consumer-level advice, Consumer Reports’ ice dam guide covers insurance considerations and DIY risks worth reading before you touch a ladder.
Frequently Asked Questions
What is an ice dam on a roof, exactly?
An ice dam is a ridge of solid ice that forms along a roof’s eave when snow higher up the roof melts, runs downhill, and refreezes at the colder edge, eventually blocking water from draining off the roof.
Can I remove an ice dam myself?
You can safely handle prevention steps from the ground, like roof raking fresh snow or laying calcium chloride socks to open a drainage channel, but removing an established, thick ice dam from the roof itself is a job for a professional with the right equipment and fall protection.
Will homeowners insurance cover ice dam damage?
Coverage varies by policy and often depends on whether the damage is classified as sudden versus gradual, so it’s worth checking your policy details and documenting damage with photos as soon as you notice it.
How much insulation do I need to prevent ice dams?
Most cold-climate guidance recommends a moderate to high level of attic floor insulation, with higher values generally recommended in the coldest regions, though the right target depends on your specific climate zone and roof assembly.
Do heat cables actually stop ice dams?
Heat cables can melt a channel through existing ice and provide short-term relief, but they treat the symptom rather than the cause and add an ongoing electricity cost and annual maintenance requirement.
How do I know if my ice dam problem is serious enough to call a contractor?
Interior water stains, a ridge of ice that keeps growing despite raking, or the same dam forming in the same spot year after year are all signs the problem has moved past what DIY tools can fix.
Sources
- Dealing with and preventing ice dams | UMN Extension
- BSI-97: De-Icing Ice (Building Science Corporation)
- Construct roofs and attics for ice-dam prevention | BASC/PNNL resource guide
- Preventing ice dams | UMass Building and Construction Technology
- How to prevent ice dams from damaging your home | Consumer Reports